

In This Example We Will Add Webhook Posted Data To A Google Sheet Using Integromat
Using webhooks in Integromat means that we will be able to receive and manipulate data from third party services that support the use of webhooks.
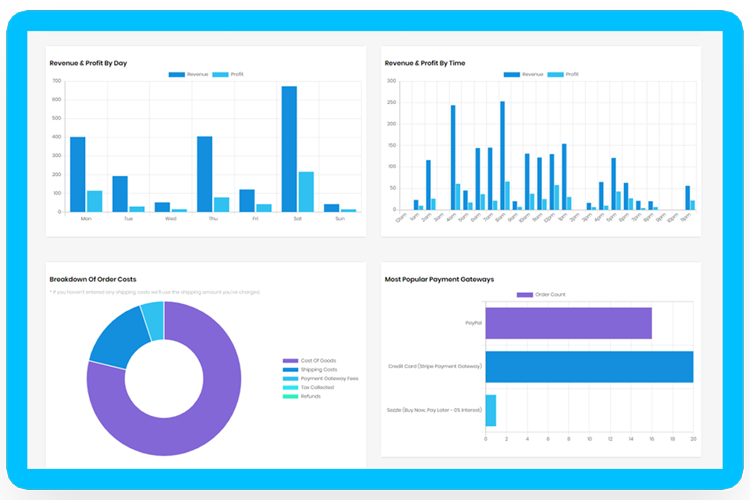
For this example, we will use the webhook data that is broadcast by our WooCommerce Cost Of Goods Plugin Alpha Insights and then add that data to a Google Sheets row.
Log In To Integromat & Create New Scenario

Once you are on your dashboard you can click the button at the top right Create A New Scenario
Configure Integromat To Receive Webhook Data

Click the big blue + icon in the middle to add a new module.

Search for a module called Webhooks and then click on it once you find it to add it to your scenario.
This is where we begin to receive our data.
You will be presented with a few options once you select this.

In this case we want to select the Custom webhook (instant) configuration.
This means that it will trigger every time we receive the webhook data.
Once you click on Custom Webhook the Webhooks module will load and ask you to create your first Webhook URL.
Create Your Webhook URL For Integromat
This is where Integromat will be looking to receive your data.
They will give you your own unique URL and you can have more than one.

The marone window will pop up once you add your Webhook module, if not you can bring it up again by clicking on the center of the big marone ball in the middle of your page.
It’s asking you which webhook you want to use, at this stage you won’t have one so you want to click add (circled in red).
This will open the second blue window.
Name your webhook whatever you want and click save.
Testing Your Webhook URL
At this stage, your webhook URL is now active.
Once you have created your webhook and used it on your module, you will see your webhook URL and it will currently be listening for an event.

Depending on what software you are using to send data to Integromat, the next part may vary a little.
In essence though, any software will be wanting to know what the webhook URL is.

You need to grab your webhook URL and save it in the right place in your software.
In this example we are integrating with our profit reporting plugin Alpha Insights.
We’ve saved the webhook URL to the settings page and now we can start pushing data out.
Alpha Insights includes a test webhook button which will immediately broadcast data to this webhook URL making setup a lot easier.
After you have saved your webhook URL in settings, click on Test Webhook.
Once the webhook test data has been broadcast, Integromat should show “successfully determined” stating that it’s received data.
Setting Up Google Sheets For Webhook Data
At this stage, if you haven’t already made up a Google Sheets document I would encourage you to do so.
Be mindful of which account you made this Google Sheet under as we will need to log into that account shortly.
Add the Google Sheets module by clicking on the add another module button and searching for Google Sheets module.

Once you’ve found and clicked on the Google Sheets module, you will be presented with a list of actions.
We are wanting to add a row so make sure you select that action.

If you haven’t already done so you will need to add your Google Account
Simply click Add, name your connection and then log in with the relevant Google Account (the account that contains the Google Sheet you are working on).

Once you have connected your Google account, you should be able to find the relevant Spreadsheet.
Select your spreadsheet and then select the sheet you want to add data to.
It’s a good idea to have headers already in your spreadsheet as it helps you map out your data.
If you’ve added headers to your Google Sheet already, set table contains headers to yes.
Mapping Your Webhook Data To Google Sheets Columns
Finally we are going to configure our webhook data to be added to Google Sheets how we want.
You will see a list of your Google Sheets headers at the bottom of the module options as pictured below.
This is where we are going to add our data, as you can see i’ve already named a few of my headers (this is done in the actual sheet).

Now if you’ve set your webhook correctly, all you need to do is click in any one of the fields and your webhook data will be ready to add.

Go through and add the data you want by clicking on any of the marone boxes.
Click OK once you’re done.

And that’s it, you’re all done!
You should now save your scenario using the button at the bottom and then turn it on by making sure the scheduling button is set to on.


